Saturday, December 5, 2009
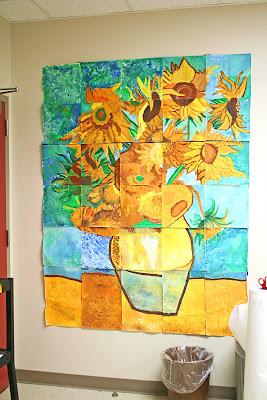
Van Gogh mural
This mural was created by fourth grade students with tempra paint and oil pastels. Students each got a square cut from a large print and a square white paper. The students made a grid on the little square and the paper and transfered the drawing of their section of the painting onto their paper. Then they painted with large impressionist brush strokes and then used oil pastel to accent edges when dry. We taped them all together at the end to make the mural and they were so excited!


Thursday, December 3, 2009
Radial Design
Wednesday, December 2, 2009
Hip-hop Art
We had some visitors at our school who rapped and danced and talked about the hip-hop art culture. We talked about how graffitti was a federal offense and so was wrinting on school property, then we looked at some art. Kind of similar to graffiti but on canvases. Students started with a shape and made lots of organic shapes around it like puzzle peices but none of the shapes could touch. They made letters into organic shapes and hid their names somewhere in the picture. Some students made symbols of things they like (scateboard logos,clothing labels,or characters) and cut them out of tag board and used 3-D O's to stick them on so they pop up a little.
We mounted them on black paper and used silver sharpies to continue the shapes for an interesting border.

We mounted them on black paper and used silver sharpies to continue the shapes for an interesting border.

Monday, November 30, 2009
Watercolor Landscapes
Watercolor Landscapes
 For this project I was inspired by the beautiful painting below by Mr. E on his awesome blog..check it out http://artwithmre.blogspot.com/2009/01/some-of-my-grad-school-art-work-from.html I LOVE LOVE the earth tones, texture, and patterns
 We used the Sargent liquid watercolor paints

-Next week continue with mountains
 For this project I was inspired by the beautiful painting below by Mr. E on his awesome blog..check it out http://artwithmre.blogspot.com/2009/01/some-of-my-grad-school-art-work-from.html I LOVE LOVE the earth tones, texture, and patterns
 We used the Sargent liquid watercolor paints
-then they draw a horizontal line for a lake and two large rock/mountains on either side of the lake
-then about 4-5 medium size middleground mountains
-then some tiny mountains at the top for the background
painting:
-each mountain has must have either green+color of choice or brown+color of choice to create earth tones
-choose mountains that don't touch so they don't run together
-start by painting a mountain with water (for wet on wet) paint a dark line of green/brown add a line of color of choice on top of green/brown all around the edge only, rinse brush and fill in the middle with more water blending the edges into the middle keeping the edges dark and the middle light and letting the colors blend naturally from the water.
-students can add salt while its wet to add texture

-Next week continue with mountains
The next week students use the bright colors of the sunset from yellow to orange and use magenta to merge the warm colors to cool colors, mx magenta with blue to make beautiful violet. My students got to the second day and their mountains were BEAUTIFUL!! but I suddenly went on maternity leave unexpectedly due to preterm labor and never got to finish. I'm not sure how they turned out with the sub :-( so I don't have any student work photos.
what I would do to finish is create different patterns on the mountains and or trees like the painting by Mr. E
Thursday, November 26, 2009
Tuesday, November 24, 2009
Gustav Klimt Trees
We made the Gustav Klimt Tree of Life last year. We first painted a paper with gold tempra. Then used brown tempra to make the tree(as seen in steps below). Then students decorated patterns and shapes (concentric circles, triangle leaves on swirly vines, black and white shapes on the tree trunk, and tiny dots using the bak end of a cuetip and silver and gold paint) Students learned about the artist, but can't veiw many smaples since most are nudes. They learned about gold engraving and like to pretend the paint is liquid gold.


Friday, November 20, 2009
Cherry Blossom Tree Scrolls
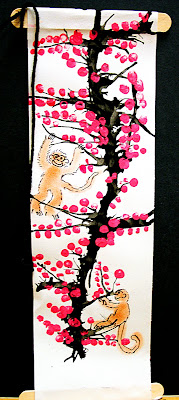
I did this with first and second grade and it was simple and turned out really cute!
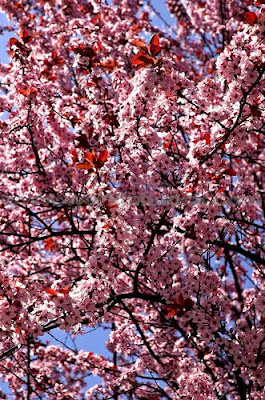
 First we looked at photos of Cherry blossom trees and discover the culture and traditions that surround Japanese cherry blossom trees. http://www.kwintessential.co.uk/articles/article/Japan/Japanese-Cherry-Blossom-Trees/1582
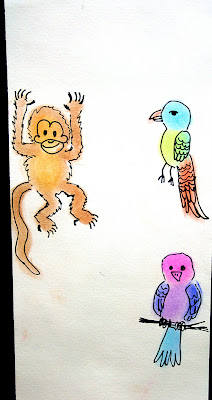
First we used chalk to make fingerprint creatures (birds and monkeys) and outlined them with a fine tip black marker.

We used tissue on their finger so they could move the tissue over a little when they change colors and they don't get their fingers dirty. Then draw fur and feathers and details
I went around the room and painted a wavy line from top to bottom of their paper with watered down tempra, idia ink works well too. Each student had a tiny coffee straw and first blew the branched down the left side then turned the paper and blew down the right side. We glued a large popcicle stick on both ends and tied yarn on the ends
 First we looked at photos of Cherry blossom trees and discover the culture and traditions that surround Japanese cherry blossom trees. http://www.kwintessential.co.uk/articles/article/Japan/Japanese-Cherry-Blossom-Trees/1582
First we used chalk to make fingerprint creatures (birds and monkeys) and outlined them with a fine tip black marker.

We used tissue on their finger so they could move the tissue over a little when they change colors and they don't get their fingers dirty. Then draw fur and feathers and details

I went around the room and painted a wavy line from top to bottom of their paper with watered down tempra, idia ink works well too. Each student had a tiny coffee straw and first blew the branched down the left side then turned the paper and blew down the right side. We glued a large popcicle stick on both ends and tied yarn on the ends
Thursday, November 19, 2009
Picasso Rock Stars
My theme this year is "Art Rocks" so for this project instead of self portraits as I have done in the past, we did Rock Stars. I printed lots of pictures of iconic and popular music artists that the kids would recognize. They LOOOVED this, Michael Jackson, Hannah Montana, Jonas Brothers, Gene Simmons, Elvis, Madonna, etc.
We studied for the first week about Picasso; his art, his family, schooling, different styles and periods, and looked at lots of books and art samples.
I connected him with rock stars because of how he felt isolated in his special group of talented artists who like to think out of the box and create a new "normal" for realism, which was one reason he liked painting circus people in his rose period, because they were unique and different. Rock Stars are different and may also feel isolated from the world because of their fame. I told them that Picasso was famous like a rock star!
The first class we drew a crazy profile veiw of their music artist. They learned how to draw a profile, face proportions, and profile eyes.
The next class they had to draw their artist from the front veiw. The drawing had to be divided into shapes, and totally colored with a variety of colors using oil pastel. Eyes had to have an iris, pupil, and reflection of light (any shape or color)
You have to stress that each drawing must be the same size to fit together when combined
Then the two drawings are cut out and glued together to make one face combined. Students could cut out the eye in the back and glue it in the front if they liked it better than the overlapping one, they could also cut the lips like a flap and have them overlap the profile face as well.
Students could work on this awesomely fun website when finished! http://www.mrpicassohead.com/


Tuesday, November 17, 2009
Color Wheel Self Portrait Mural
This was my first day of school project this year. Since the students are learning the color wheel I thought it would introduce color relationships in a fun way. Each table had a different color . One color. Since they had markers, pencils, and crayons, it allowed for various shades and hues of the same color. The 4th and fifth graders could use 2 colors; one color and one analogus color to make the intermediate color transitions in the mural from one color to the next. For the border I put butcher paper on each table and let kinder and first draw and paint different kinds of lines with their lines and color lesson, then cut it into strips to use for border. I glued all the index cardstogether on a looooooong piece of butcher paper in color order to create the mural.

 We talked first about drawing your face. Oval head, then ears in the middle, then hairline from one ear to the next, line for the part of the hair if its a girl, eyes where the ears are in the middle, then nose half way b/w eyes and chin, and lips half way b/w nose and chin. We lookes at many different hairstyles and how to draw them from the hair line.

 We talked first about drawing your face. Oval head, then ears in the middle, then hairline from one ear to the next, line for the part of the hair if its a girl, eyes where the ears are in the middle, then nose half way b/w eyes and chin, and lips half way b/w nose and chin. We lookes at many different hairstyles and how to draw them from the hair line.
Wednesday, November 11, 2009
Watercolor Insects
Here is a fun watercolor project for primaries k-3
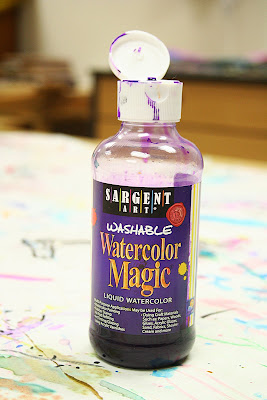
 I got these new liquid watercolors from Sargent that are my favorite EVER!!! They are extremely bright and mix very well on even the cheapest watercolor paper. I have also been very pleased with the Canson watercolor paper because it is good quality and resonably priced
 We have been studying the color wheel and the students have mastered primary, seondary and intermediate colors. For this project we talked about warm and cool colors


the first day i let the kids experimant with mixing the liquid watercolors wet on wet to let the water mix the colors and use very little brush to paper action. they could also spirnkle water drops on them to see white spots form. We tried to keep complimentary colors away from each other so they didn't get muddy.
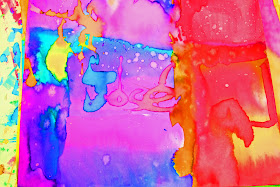 If their watercolors were dry they could add details on top for layering like these eyes and some made flowers and butterflies

Each student was to pick an insect and draw it nie and big on their paper. then draw a cirle under it. this introduced overlapping to kindergarten when the insect's wings overlapped the circle. Then we looked at examples of close up photos to see how things run off the edge or get cut off. the petals had to run off the edge of the paper.
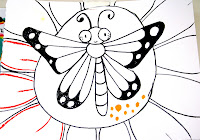
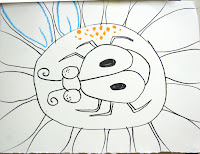
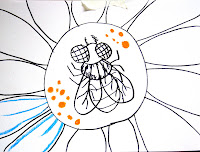 After the student finished the drawing they could add dots on the flower center, and lines on the petals with oil pastels

Then the tables were divided into warm color tables and cool color tables. Students had to paint only the INSECT and the SKY this class period using only warm or cool colors
 I got these new liquid watercolors from Sargent that are my favorite EVER!!! They are extremely bright and mix very well on even the cheapest watercolor paper. I have also been very pleased with the Canson watercolor paper because it is good quality and resonably priced
 We have been studying the color wheel and the students have mastered primary, seondary and intermediate colors. For this project we talked about warm and cool colors

the first day i let the kids experimant with mixing the liquid watercolors wet on wet to let the water mix the colors and use very little brush to paper action. they could also spirnkle water drops on them to see white spots form. We tried to keep complimentary colors away from each other so they didn't get muddy.
 If their watercolors were dry they could add details on top for layering like these eyes and some made flowers and butterflies
Each student was to pick an insect and draw it nie and big on their paper. then draw a cirle under it. this introduced overlapping to kindergarten when the insect's wings overlapped the circle. Then we looked at examples of close up photos to see how things run off the edge or get cut off. the petals had to run off the edge of the paper.


 After the student finished the drawing they could add dots on the flower center, and lines on the petals with oil pastels
Then the tables were divided into warm color tables and cool color tables. Students had to paint only the INSECT and the SKY this class period using only warm or cool colors


