Saturday, December 19, 2015
Friday, December 11, 2015
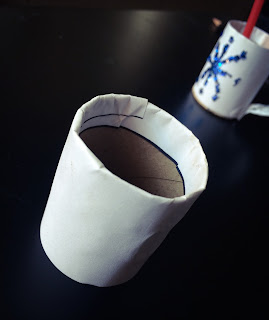
TP tube Cocoa Mug Ornament!! Winter One Day Project!!
I got this idea from this clever blogger!! http://www.megacrafty.com/2011/12/turn-pt-tubes-into-hot-chocolate.html?m=1
Wednesday, December 2, 2015
Art to Remember Peacocks, Zentangle Animals, Trees, Hand Print Fish
This year we are doing a fundraiser with Art to Remember. This is a fabulous company that turns your student's artwork into all kinds of cool products!
You can click the link on the Art To Remember advertisement on the side of my blog to learn more!!
Here is the lesson plan for the peacocks
***FEATURED APP**
The video above was made using the free App "Motion Portrait"
It is SO fun, just draw or paint a picture of someone, take a photo, and bring it to LIFE!!
Third graders made these cool trees!
5th graders made a zentangle animal with a gradation value background. They turned out SO beautiful!!
The company made it very easy by providing labels for each child's art. After labeling we packed them up and sent them off to be printed.
Next we received an order form for every child with a picture of their artwork on the front and inside were pictures of all the fabulous items you can purchase!
Here's a Holiday Draw-a-long of the Grinch to try!!
Shrimp, BunBun, and Rudy wish you a VERY Merry Christmas!!!
Sunday, November 22, 2015
Roses Roses Roses!!!
The past two weeks we have been learning about the life of the artist, Frida Kahlo. In honor of Frida we made a composition using oil pastels and a color gradient background with tempera paint.
First we looked at different colors of roses and practiced drawing them with this step by step
Then they chose 2 colors of oil pastels. They colored a thick dark line on the top and the bottom of every petal, then used their finger to "smoosh" the color down and up making a nice soft blend from dark to light.
Kids learned about the art elements color and value.
We looked at the color wheel and tried to use analogus colors for our roses
kinder artist!!
1st grade artist!!
When we finished the roses, we painted the background using one color and a gradient from light to dark.
First everyone started with a plate with white paint and a tiny squirt of black. The table group mixes the colors to make light gray and paints their first line. When everyone was finished with that line they raised their hand and I came and gave them another squirt of black paint. We did this until we had 5 shades of gray. They LOVED seeing it change to a darker color when they mixed it each time!! Then I gave them straight black on a separate plate to paint the remaining white paper out to the edges.
Above second grade and below are 1st graders painting their backgrounds from light to dark using "follow the leader lines"
We chose the neutral color for the background to make the color pop!
Some 2nd grade classes wanted green and blue for their backgrounds.
This second grader chose black and gray for her rose. When we made the background she asked for a brighter color for her background, so she used neon pink. I love her out of the box color choices!! After the 5th graders saw her rose, they all wanted to make black and gray roses with neon backgrounds!! I love when a creative kid completely changes up my lesson plans!!
these are second grade roses
Below are third grade roses


