Tuesday, November 22, 2016

Shaving Cream Marbleized Starry Night Cactus!

 My fifth graders are having SO much fun making these!!!


For this project you will need:
watercolor paper
shaving cream
liquid watercolor or food coloring
scraper
paint brush
watercolor pencils


-First, spread shaving cream on the table the size of your paper
-Then drip the paint directly on the shaving cream where you want your cactus to go
- Then drip blue and turquoise paint around the green drips for the sky
-finally a few tiny drips of yellow for moon and stars, plus red or pink for the flowers


Next you will use the back end of a paint brush to make tiny swirls. IT IS VERY IMPORTANT that the brush TOUCHES the table and stands STRAIGHT UP, if it leans and isn't straight up and down it will not work


 - Next place the paper directly on the shaving cream and tap it gently to release and air bubbles
Lift the paper 

 and use a scraper to scrape ALL the shaving cream off the paper. This is when everyone gets excited! You will hear OOOOhs and AAAAHHHHs!!! IF you miss any it will be blurry, so make sure to get it all off


When you are finished with the print you can use watercolor pencils dipped in water to outline your cactus. You can also use pan watercolors to fill in the edges or add more color. Another fun material to use is Reeves water soluble oil pastels dipped in water. 


Clean up is always the BEST PART for this project!!!


Saturday, November 19, 2016

Feather Wings Mural

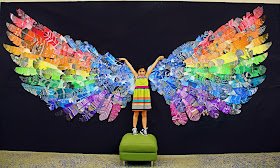
The past few months my students have been making feathers for a group mural. This idea was inspired by my friend and celebrity in the art community, Cassie Stephens! Head on over to her blog and check out her magical art teacher'n treasures at Cassie Stephen's Blog!! Her original inspo was international street artist, Kelsey Montague. Her inspiring murals challenge people to ask the question "What Lifts you"
"What makes your heart Soar?"
My students are going to be writing about their passions and inspirations that "lifts" them! I want each student that comes to my art class to feel as though they are walking out with wings on their back, so they can bravely rise up to their dreams with courage and passion! I want them to feel confident in themselves and know that the sky is the limit! 

 First, students painted on watercolor paper with tempera paint using a value gradient of tints and shades using one color plus black on the left and white on the right. They had to blend the colors so thet the different shades did not look like stripes

One group did primary and secondary colors red, orange, yellow, green blue, and violet. The next group would paint intermediate colors, red-orange, yellow-orange, yellow-green, blue-green, blue-violet, and red=violet


Fourth and fifth graders used 9' by 24' paper and 3rd graders used smaller paper
 the next class, students then traced different shapes of feathers using white prisma color pencils
 and cut them out
then they decorated them with unique lines and designs with white prisma color pencils

 My wonderful and extremely talented student teacher, Naz Kaya Erdal and I layed them out on three large sheets of black butcher paper until the feathers looked symmetrical.
Once we finished the shape, we taped each feather down to the paper with painter's tape 


Then I hung that bad boy with TONS and tons and TONS of staples!! 
The next morning the kids were SO excited to find their feathers turned into GIANT wings!!!


I hope the parents who come to visit will snap a pic in front of the wings and post to #ArtisFly and #riseupandsoar hashtags for social media!


Monday, October 3, 2016

5th Grade multi media Collage

Fifth grade has worked so hard on these multi media collage pieces!
Layer 1 was painting
Layer2 was paper collage
Layer 3 was oil pastel shapes
and Layer 4 was painting, dripping, stamping


 We did some zerox gel transfers with animals


Thursday, September 22, 2016

Fall'n in Love With Leaf Printing

This week my 3rd and 4th grade students kicked off the first week of Fall by making leaf prints!! These leaves came off a sycamore tree and have a sort of fuzz on the back that soaks up the watercolors and allows them to blend beautifully! 

I let them paint it however they wanted. This student painted the sky on hers and asked me to take a picture of the leaf  against the sky to see the camouflage effect! 


We used the crayola 16 color box which is my absolute fav right now! 

 We tried it with other leaves too


Students learned about craftsmanship and we talked about keeping their paper background nice and clean without smudges.  


 My younger grades made crayon resist paintings and leaf rubbings with multiple colors. We are ready for Fall and cooloer temps in Houston!