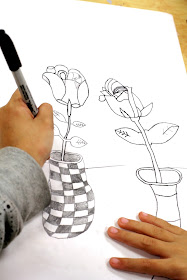
When teaching a still life my goal is to take them from drawing the "swirly" rose in Exibit A below

to the rose in Exibit B below....using their eyes!

Students must learn to use their EYES to draw.
When we draw the roses I tell them to pretend their pencil is an airplane, their paper is the runway, but they must use their eyes to fuel the plane so that it can take off across the runway!!
Their brain tells them to draw the swirly curly center, but they must train their mind to DRAW WHAT THEY SEE!
So here is how I teach Still Life Roses
First, look at LOTS of Roses and talk about them! I had these LSU roses because a teacher got them for V-Day and they were SO cool!!
This turned out to be a great SCIENCE lesson about how they got the roses to be this color!
.
1. Draw a contour line around the rose using your eyes.
It is like tracing your hand; go all the way around with nothing in the middle.
I tell them over and over to keep their EYES on the rose and draw every point, bump, and hill.
Also remind them to draw big. I tell them the rose must be the size of their hand. They draw a very light oval around their hand and try to fit it inside. That also helps with placement on the page if they are drawing more than one.
2. Then they begin with the bottom petals because they are in the front.
3. Then they move around the rose, drawing the outer petals first, saving the center and top of the rose till the end. Keep reminding students to keep their EYES on the rose!
4. When they draw the center of the rose, I tell them to look at each petal as a shape, and see where that shape connects to the other shapes. NO SWIRL in the middle. Look where each petal starts and stops.
5. When they draw the leaves/stem, they must look at each leaf as a shape. If it is sideways, it will be a long, thin shape, also notice when the leaves overlap the stem, they won't always be on either side of the stem.
Keep your eyes on the ROSE!
These are third grade drawings below...
Keep your EYES on the ROSE
We used white roses because that was what I got for Valentine's Day, but do not use white if you have a choice. Dark red or multi colored roses are easier to see!!
When they finish drawing we outlined the roses with an extra fine-tip Sharpie. They could draw and decorate a creative flower vase if they wanted.
Some of the fifth graders finished quickly and started painting today.
We talked about how to create value with watercolor. They looked for the highlights where they must paint very light, and the shadows which need to be darker.
The roses below are from fourth grade! I cannot wait to post the finished results next week! They are going to use liquid watercolors in all different colors!


Can't wait to see the finished roses! :)
ReplyDeleteThanks for sharing all the detailed pictures and instructions. What a great project! And fun idea for Valentines' Day. I am curious as to what brand of liquid watercolors you used. I have recently discovered the Dick Blick brand of liquid watercolors and love the vivid brightness of them. I can't wait to try this with my students.
ReplyDeleteWow. What a great (and difficult!) art project. I can't wait to see the children's beautiful flowers. Great job!
ReplyDeleteThis comment has been removed by the author.
ReplyDeleteThe drawing are incredible! Must be your wonderful teaching :)
ReplyDelete