Search This Blog

Tuesday, August 31, 2010

Great video for self portrait project

I found this great video on www.teachertube.com

http://www.teachertube.com/viewVideo.php?video_id=54540&title=Self_Portrait_Stories

It goes with the first week of school self portrait lesson. My students loved it, and it was a great way to start off the class and get them excited about drawing themselves!

Wednesday, August 25, 2010

updated Beginning of Year FAVORITE ART PrOdUcTS (must haves)

I have had so many great e-mails and comments with great ideas I need to update this post
Here is a link to find the Kid Smart markers, http://www.teacherdirect.com/products/87144+DRI.htm
A few more things that i want to add are
black sharpies and black oil pastels. Need I say more? There is an option in the Sax catalog to buy only black oil pastels!
sharpie
There are several varieties of the safe-t-cut linoleum blocks. There was a stack of these in my cabinet when I got here(I am not sure which ones they are because I didn’t buy them) and the art teacher told me that I could cut them on the paper cutter and they are erasers. It is nothing but a huge eraser!! I have not had to buy erasers in the four years I have been at this school and one large block cut into erasers lasts me 6 months to a year depending on how many grow legs and walk out each month!! If you have some of this safety-cut linoleum you should try it! They make the BEST erasers and you can cut them REALLY big so that it doesn’t fit in their pockets!!
Also Canson Watercolor paper is awesome!

Okay I really hate making orders, but since this is my 8th year teaching, I have some favorites that are my standby first on the list, must haves. I thought I would share them with you.

These brushes are WONDERFUL! If you do not leave them in water (which is really bad for brushes because it loosens the glue and makes the bristles begin to fall out) and dry them flat not standing they are the greatest classroom brushes and the pack comes with these great smocks!

brushes

These are my faaaaaaaaaavorite oil pastels. They have a hexagonal shape which means that they won’t roll onto your floor as easily and get stepped on. The colors are brilliant and great for teaching value because there are at least two or three hues of every color (light blue, medium blue, dark blue, light green, medium green, and dark green, etc.) I LOOOVE them!

oil pastels oilpast

If you are an elementary art teacher these pencils are a MUST HAVE!! They are big and hardly ever have to be sharpened. They make nice big bold lines and since the lead is so large it keeps a point for DAYS!!!

pencil pencils2

When I came to my school the old art teacher had stock in the glitter paint and I thought I would never use it! It has become a regular thing now. Kids LOVE sparkle and bling. A little tiny dab of glitter paint adds a lot of WOW to ANY artwork, drawing, watercolor painting, or sculpture!!

glitter paint

These little liquid watercolors ROCK THE HOUSE! I will be getting LOTS this year. They are sooooooooo beautiful SUPER BOLD AND BRIGHT and cannot be matched by any other! I use them in my personal watercolor paintings now. They are amazing!

watercolors

If you are still spending your afternoons staying afterschool to wash plastic paint containers, do yourself a favor and get these. They are GREAT!!

cups

If you have to go with the box kind, Prang just makes pretty watercolos

prang

These Biggie Tempra cakes are soooooo good and save the time of pouring all those colors from bottles. Just hard to do projects with limited color pallets.

biggie cakes

These are hands down, the BEST markers in the world. They way they look when they dry looks almost like paint. They have a creamy solid smooth looking finish and of course the obvious 60b day cap off time!! Yes, they will stay good for 60 DAYS WITH NO CAP!!! Why would you buy anything else!


I hope you enjoyed this list. If you have any great awesome products to share, please e-mail me Natty241@hotmail.com I would love to hear about them and add them to my list!!

Ceramic pumpkins

Ceramic Halloween Pumpkins

I found this lesson at http://www.inthirdspace.net/

I am so excited to make these with my third graders!!

pumpkin It comes from Ellen at Clayworks Studio. It’s basically making two pinch pots and blending them together. My kids grade 3-5 loved making these and the success rate was very high!

1. Give each student a piece of clay about the size of a small apple. Instruct them to remove a small piece for the stem and set aside. The rest of the clay is to be split into 2 sections.

2. After warming and softening the clay with their hands, each of the 2 sections needs to be turned into a ball and then into a smooth pinch pot. The goal is to have 2 bowls that roughly match each other in size.

3. Discuss how any time clay pieces are to be blended together, they need to be scored (scratched) and “puttied” together with slip (clay mud). Roughen up the edges of each bowl with a fork, wet with slip, and gently push the two bowls together. Use clay tool to blend together and hide seam.

4. A small stem is to be formed from the last piece of clay. It also gets scored and slipped on what is determined to be the top of the ball. Encourage extra blending on stem base as they are prone to fall off otherwise.

5. The students then hold the pumpkin in their hands and use a round tube, such as a jumbo-size pencil to push in ridges. If they rock the pencil from the stem to the bottom, rotate, and press again, they will form what look like the ridges of the pumpkin. Names may then be scored onto the bottom.

6. The next day, I had students draw lightly on the clay what they wanted their faces to look like. I kept it simple with only allowing circles, triangles or squares (no teeth!). It takes a sharp knife to cut out the faces, so I did it for them with an xacto knife.

7. When the clay is no longer cool to the touch, do a bisque firing with all the pumpkins. Have the students paint the pumpkins with glaze, and fire again.

Related posts:

  1. Turkey Pinch Pot I found t
  2. Ceramic Snowman Sometimes
  3. Many-Colored Hands I’ve foun
  4. Bone Letters You could
  5. Watercolor Sheep I love al

Saturday, August 21, 2010

Cool Clay projects and Groovy Glazes!


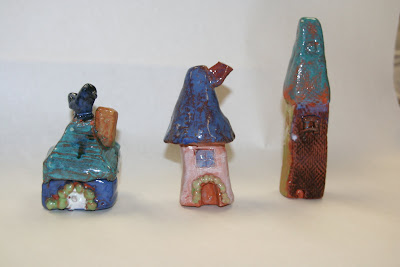
IMG_7554 I LOVE these little houses. Shannon used architecture as a theme, and showed them all different forms of columns, turrets, roofs, and made a geometry connection. Students made cone roofs, triangular prism roofs, rectangular prisms and cubes for the bottom part, and tiny spheres for the rocks around the doors. They also used lots of items like rocks and texture plates for texture on the house that look really cool after glazing.


Yesterday one of my friend and fellow art teachers from http://www.missartclass.blogspot.com/ (under construction) came over and showed me some cool clay samples for IDEAS since I am trying to focus on lay this year!


Below is a “nature pocket” with a sun, a flower and a butterfly. There is a pocket under the green part to hang and put flowers in it!!


IMG_7551


These are giant clay belt buckles painted with gold and silver tempra. They even have the buckle attachment on the back! They were cut from a slab.


IMG_7555 IMG_7556


This is a tile painted with watercolor made to look like a view from a broken window. They clay sucks up the watercolor so fast it doesn’t have time to drip in the cracks.


IMG_7559


These fish were textured using those plastic texture plates usually used for crayon rubbings!! The leather cord adds a nice organic looking touch!!


IMG_7560 IMG_7561


I use my texture plates for lots of different things. They are great to have in the art room!


texture


Christmas cookie ornament. This is a great project for kinder. Shannon places all kinds of objects on the table (shells macaroni, sticks, legos,little toys, rocks, beads, marker tops) She precuts the clay slab with a biscuit cutter and puts the children’s name already on the back. She uses a translucent white glaze called pearl as the icing (she said this example had way too much glaze and that usually you can see the imprints much better)


IMG_7562


I also love this idea of making pinch pot fish and pinch pot monsters. Just make a pinch pot, turn it on its side and add eyes, fins, antenae, scales, texture, tails, claws arms, wings, ect.!!


pinchfish pinchfish2


This summer I learne some awesome new things at my Mayco glaze inservice. One thing that BLEW MY MIND was that you can paint glaze on WET or bone dry CLAY!!! YEEEES you DO NOT have to fire it before glazing!


The pot below was made with the COOLEST glaze by Mayco called cobblestone. First paint your sculpture with black foundation glaze, the two coats of mayco cobblestone, then one thin coat of ANY OLOR. The cobblestone makes the color break into little raised cobblestone like shapes and then the black shows through the cracks! Its AMAZING!


cobblestone


Below are the SUPER POPULAR “Jungle Gems” crystal glazes by Mayco. The glazes have little chunks in them that explode and melt into little color specs after fired! They look so cool and if you want the background color to be different. You can paint a coat of a darker color on top and the color gems will show through. We used the orangy one below but put black foundations on top to that the little red, yellow and green flecks will show on a black background.


junglegems


I found this project on the Mayco website. I think it would be cute with pinch pots! Then they could add the bird. It would even be cool to put blue marbles inside to melt the glass and look like water!!! It is good to crush the marbles in a sock with a hammer first.


bird


I hope you liked these clay ideas as much as I did! Let me know if you use any of them and post pics of your results! You can order Mayco glazes and see lots of other cool clay projects http://maycocolors.com/index.html

Tuesday, August 17, 2010

First Week of School Ideas!!!! (oops added the lesson to the bottom)

Hello blogging world art teacher friends!!! For some of you, the summer is coming to the close and the fresh smell of empty rooms and blank planners is near!!! I am in need of some great beginning of school activities. I have posted below my all time favorite first week of school activity for you!!! It was easy to set up, mess free, and made a BEAUTIFUL display (great way to start out the year) I would LOVE now, for you to post YOUR beginning of the year activities for inspiration!!! I love reading all of your blogs and use so many of your fabulous ideas!!! If you want the lesson plan for the activity below, just e-mail me and I’ll send it over! Natty241@hotmail.com

If your blog is not on my blog roll PLEASE comment or e-mail it to me so I can add you!! Ok, the lesson below is the one i was talking about. It didn’t publish earlier so here it is. I posted this last year but here it is again!

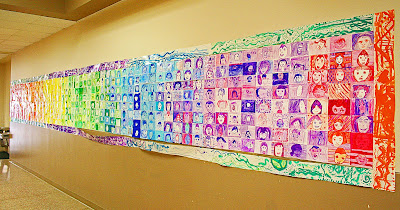
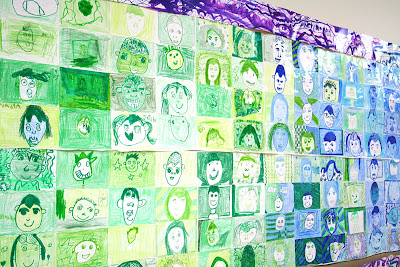
This was my first day of school project this year. It was a great way to learn their names and talk about how special and different everyone is! I did this with grades kinder through fifth and they ALL loved it! Since the students are learning the color wheel I thought it would introduce color relationships in a fun way. Each table had a different color . One color. Red table had red, blue tables had blue, yellow had yellow, and so on. Since they had markers, pencils, and crayons, it allowed for various shades and hues of the same color. The 4th and fifth graders could use 2 colors; one color and one analogus color to make the intermediate color transitions in the mural from one color to the next. For the border I put butcher paper on each table and let kinder and first draw and paint different kinds of lines with their lines and color lesson, then cut it into strips to use for border. I glued all the index cardstogether on a looooooong piece of butcher paper in color order to create the mural.


We talked first about drawing your face. Oval head, then ears in the middle, then hairline from one ear to the next, line for the part of the hair if its a girl, eyes where the ears are in the middle, then nose half way b/w eyes and chin, and lips half way b/w nose and chin. We looked at many different hairstyles and how to draw them from the hair line.


Total Pageviews