Search This Blog

Showing posts with label paper collage. Show all posts

Thursday, November 1, 2012

Panamanian Molas and a special artist!

This is my fourth post this week. I am trying to get caught up by posting every day this week! I always LOVE to hear your thoughts when you leave me comments!
 BTW I wanted to leave this update to the Batik post! Phyl left a fabulous comment and I wanted to share because I have gotten several emails from people who have been doing that in their classrooms!! HEre is the great advice she left in her comment
 I did a few things a little differently when I did batik with my classes. First of all, we put our wax in muffin tins floating in electric fry pans - that way you don't have to worry about cracking glass. We used some paraffin and then added crayon color. The paraffin crackles quite nicely, and extends the crayon color so you don't need to use quite so many crayons. We also had a couple of wax melter units that could be used for smaller amounts of wax. For fabric, to save money we used old white sheets. The whiter the fabric, the brighter the results. So if you buy muslin, you want to make sure it is BLEACHED.

We did not use Rit Dye, because at the time they did not have cold water dyes. I recall using Procion cold water dyes - the colors were very vivid. If you add water to dye, it cannot be warm! 

We ironed between newspaper, and used a LOT of newspaper to get out all the wax for a whole class of students. I would be concerned that all the colored wax of the crayons could really ruin a dry mount press. I had an old iron that was just designated for wax stuff.

....Back to MOLAS!!!
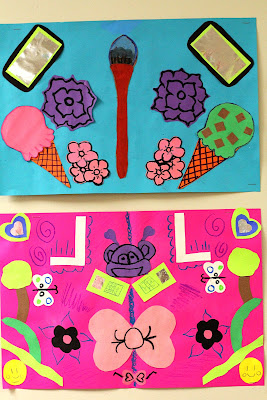
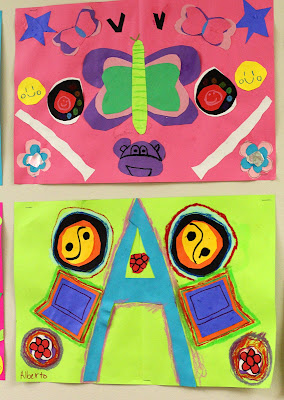
The fifth graders studied about the beautiful Molas of Panama this year. Molas are handmade with bright colors of fabric. They are usually symmetrical and incorporate things that the Panamanian people see in their daily lives.


The word "mola" means "shirt" or "clothing" and is a part of the traditional costume of the Kuna women in Panama.


Fifth graders had to come up with a design that represented them as unique individuals. They had to incorporate things they use/see in daily life. Things that meant something, and inspired them. 


Each shape needed to have at least three layers of paper underneath to create the concentric lines around the shapes


Last week one of my fifth grade students brought in this drawing on a small piece of cardboard. I thought it was such a great drawing with a fabulous composition; he is very talented. 
I took a picture of the drawing and projected it on a few pieces of large butcher paper and gave him some black paint. He finished his "greatest masterpiece" in about 55 minutes! He was so excited and I love how it turned out!! 


Wednesday, October 31, 2012

Happy Halloween! Skippyjon Jones, and more Skellies!

I don't usually repeat lessons, but I have done this one for the past few years because it is so much fun and the kids get very creative! This year, some of them even added furniture and tiny skeletons inside! Sleeping in their little beds and having tea parties even!

Here is a link to the lesson spooky house step by step


Okay it is no lie that I LOVE these books!! Skippy is a siamese cat who thinks he's a dog. He goes on these adventures inspired by the books he reads with his (imaginary) amigos, the "Chimichangos clan" DUDE! 

Kindergarten, first, and second grade did a VERY simple draw along consisting of ovals, triangles,circles, a "rainbow" for the body and a letter "M" between his front feet. Then we painted them with watercolor paint
Then they got to decorate their Skippy for an ADVENTURE!!!
"Zuper Giroow" I LOVE IT!!


....because every girl needs a flowery skull and cross bones on her cast! No ugly casts in this school!!


SKELLIES!!!!


Tuesday, October 30, 2012

Go Away Big Green Monster and Skeleton Marionettes

Okay I am going to try to post every day this week!
Since I have been gone so long!! I have a lot to catch up.
Here is a kinder-first grade lesson idea that you can do TODAY! It’s so easy! First check out this book from your library, it has holes cut out and is a for sure crowd pleaser for the little ones!
IMG_9082
These are the pieces I cut before class. For the eyes, they have to fold it in half and cut a circle.
IMG_9081IMG_9110
We talked about emotion and colors. They could glue the mouth happy or sad/mad
IMG_9083
The quietest table gets to have a pet!!! SSSSSSSHHHHHHH don’t wake him up…he BITES!!
IMG_9086
IMG_9091
OF course we had to add glitter at the end…this art teacher LOVES glitter!!
They also had to write Big Pink (or green or orange) Monster to incorporate writing
IMG_9092IMG_9098IMG_9100IMG_9104IMG_9112IMG_9114IMG_9115
This project was with second grade. A 30 minute lesson.
We just drew a skeleton and taped it to some popsicle sticks and boom, you’ve got a marionette! I think this idea could be embellished with some Dia De Los Muertos decorations; hair,hats,maracas, flowers, glitter, and googly eyes!!
IMG_9158
we made them talk to each other and students created  mini puppet shows
IMG_9131IMG_9138IMG_9140IMG_9145IMG_9155
This weekend my daughter decided to give herself a creative hair cut! Yes she is sporting a mullet until we can take her to get something else…right now it’s a perfect new do in time for Halloween!! With a mom for an art teacher you have to know this was imminent. She cuts very well for a two year old and has access to scissors with all of our art supplies.

She thinks we should “glue it back!” Anyone else have a haircut story?

punk

hair1
At least we had our family pictures taken last week! Heres a few of them!! Perfect timing on that!
Waggenspack Family 2012 (15)

Total Pageviews