Search This Blog

Showing posts with label clay projects. Show all posts

Monday, December 16, 2013

The Grinch Stole Christmas!!!


This week the kids are making a Grinch with a REALLY BIG heart! Students do a draw-along of the Grinch and then write a very sweet note/ or notes to a loved ones to warm his heart!! Then of course we COVER them with glitter!!!


 This weekend I had the privilege to use a very awesome studio with two of my best friends who are also art teachers to throw pottery! It was SO much fun and I got lots of Christmas presents made for all my coffee loving family members!!


My kiddos made these super cute trees and we bought some awesome sparkly green glaze for them! Can not wait to glaze and fire!


THE GRINCH!!!
We had SO much fun making the Grinch today! Here are the steps we followed for our drawings. 


The kids wrote the SWEETEST things to their families!! 
some of my favorites from today were...

-Grandma, I love you because you always has gum in your purse
-Dad, I love when mom is gone and you take us to get donuts
-Dad, I love you because you make the best chicken!
-Mom-I love how you take care of me when I'm sick even though you might get sick too!
-I love my mom because she is so pretty and smells like a sugar cookie
-Dad- I love when you ask me to help you fix things!


 I made this life size Grinch for our teachers to "Warm the Heart" of the Grinch! There were already several sweet notes on him when I left this afternoon, and I am hopeful we will fill him with lovely sentiments of kindness by the end of the week!


What is everyone out there doing for Christmas projects? Send me some comments love and email me your holiday art pictures. I will post a holiday project collection!!! ShelbyJunePhotography@gmail.com

Monday, October 29, 2012

Catching up!!! Clay Workshop

Sorry for my temporary absence! I have been SOOOO crazy busy this year.  I have SO many things to post, so I am going to begin today and try to post every day this week!!! How do you like the new blog look? I'm not married to it yet, think it still needs some tweaking.

I will start with our super awesome clay session we had this weekend!
First we made a coiled vase attempting to purposely make it as unsymmetrical as possible...here is how you do it!!
First you cut your base (any shape) and put the first coil directly on top. use a flat round tool or even a Popsicle stick to smooth the coil on using gentle downward strokes at an angle on the inside and outside.
The next coil you will offset it a tiny bit on one side, and smooth again


Each time you place a coil on, overlap it a bit and cut so when you connect them, you are connecting two even sides flush


you can see in the picture below how that left side hangs over a bit

Each time you add a coil, you make the edge that hangs over a bit more to the left 

and the next one a bit more to the left

and the next one a bit more to the left...eventually you can add half coils to throw it off horizontally and also change the direction of your twist!


and so on and on, so eventualy your vessel will begin to have a twisty shape! Like its moving! It is SO cool!!
You can see the twisted shape mine began to have after a while

Eventually you can achieve effects like these beautiful pieces by the incredibly talented Sally Doyle!


 The next thing we did was using the Extruder. If you have never used one, think of a giant playdough factory noodle maker!! We made some beautiful things with tubes. First a cross. We started with some two inch tubes from the extruder. They had sat out for about 24 hours before we started, so they wouldn't be too soft.

We started by very gently twisting them in several random directions


 We cut a hole in the side and placed the side pieces inside

then reinforce with coils to make the seams strong in the middle of the cross

then smooth them out

Flip the cross and smooth the back

then we accentuated the twist curves and added holes for the "wounds of Christ" 


 you can make so many things from the extruder...some people made candle holders and other things


Here is my finished cross...it looks like a dead piece of wood. Any ideas on how I should paint/glaze it


stay tuned for more posts to come tomorrow!!


Saturday, August 21, 2010

Cool Clay projects and Groovy Glazes!


IMG_7554 
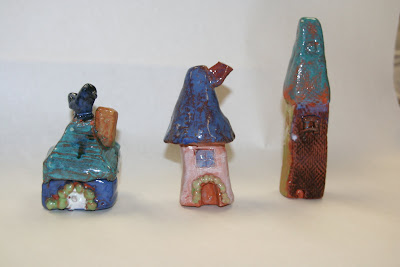
I LOVE these little houses. Shannon used architecture as a theme, and showed them all different forms of columns, turrets, roofs, and made a geometry connection. Students made cone roofs, triangular prism roofs, rectangular prisms and cubes for the bottom part, and tiny spheres for the rocks around the doors. They also used lots of items like rocks and texture plates for texture on the house that look really cool after glazing.


Yesterday one of my friend and fellow art teachers from http://www.missartclass.blogspot.com/ (under construction) came over and showed me some cool clay samples for IDEAS since I am trying to focus on lay this year!


Below is a “nature pocket” with a sun, a flower and a butterfly. There is a pocket under the green part to hang and put flowers in it!!


IMG_7551


These are giant clay belt buckles painted with gold and silver tempra. They even have the buckle attachment on the back! They were cut from a slab.


IMG_7555 IMG_7556


This is a tile painted with watercolor made to look like a view from a broken window. They clay sucks up the watercolor so fast it doesn’t have time to drip in the cracks.


IMG_7559


These fish were textured using those plastic texture plates usually used for crayon rubbings!! The leather cord adds a nice organic looking touch!!


IMG_7560 IMG_7561


I use my texture plates for lots of different things. They are great to have in the art room!


texture


Christmas cookie ornament. This is a great project for kinder. Shannon places all kinds of objects on the table (shells macaroni, sticks, legos,little toys, rocks, beads, marker tops) She precuts the clay slab with a biscuit cutter and puts the children’s name already on the back. She uses a translucent white glaze called pearl as the icing (she said this example had way too much glaze and that usually you can see the imprints much better)


IMG_7562


I also love this idea of making pinch pot fish and pinch pot monsters. Just make a pinch pot, turn it on its side and add eyes, fins, antenae, scales, texture, tails, claws arms, wings, ect.!!


pinchfish pinchfish2


This summer I learne some awesome new things at my Mayco glaze inservice. One thing that BLEW MY MIND was that you can paint glaze on WET or bone dry CLAY!!! YEEEES you DO NOT have to fire it before glazing!


The pot below was made with the COOLEST glaze by Mayco called cobblestone. First paint your sculpture with black foundation glaze, the two coats of mayco cobblestone, then one thin coat of ANY OLOR. The cobblestone makes the color break into little raised cobblestone like shapes and then the black shows through the cracks! Its AMAZING!


cobblestone


Below are the SUPER POPULAR “Jungle Gems” crystal glazes by Mayco. The glazes have little chunks in them that explode and melt into little color specs after fired! They look so cool and if you want the background color to be different. You can paint a coat of a darker color on top and the color gems will show through. We used the orangy one below but put black foundations on top to that the little red, yellow and green flecks will show on a black background.


junglegems


I found this project on the Mayco website. I think it would be cute with pinch pots! Then they could add the bird. It would even be cool to put blue marbles inside to melt the glass and look like water!!! It is good to crush the marbles in a sock with a hammer first.


bird


I hope you liked these clay ideas as much as I did! Let me know if you use any of them and post pics of your results! You can order Mayco glazes and see lots of other cool clay projects http://maycocolors.com/index.html

Total Pageviews