I will start with our super awesome clay session we had this weekend!
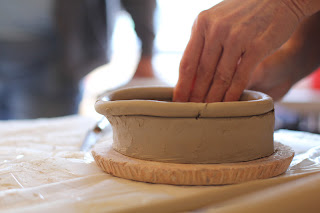
First we made a coiled vase attempting to purposely make it as unsymmetrical as possible...here is how you do it!!
First you cut your base (any shape) and put the first coil directly on top. use a flat round tool or even a Popsicle stick to smooth the coil on using gentle downward strokes at an angle on the inside and outside.
The next coil you will offset it a tiny bit on one side, and smooth again
Each time you place a coil on, overlap it a bit and cut so when you connect them, you are connecting two even sides flush
you can see in the picture below how that left side hangs over a bit
Each time you add a coil, you make the edge that hangs over a bit more to the left
and the next one a bit more to the left
and the next one a bit more to the left...eventually you can add half coils to throw it off horizontally and also change the direction of your twist!
and so on and on, so eventualy your vessel will begin to have a twisty shape! Like its moving! It is SO cool!!
You can see the twisted shape mine began to have after a while
Eventually you can achieve effects like these beautiful pieces by the incredibly talented Sally Doyle!
The next thing we did was using the Extruder. If you have never used one, think of a giant playdough factory noodle maker!! We made some beautiful things with tubes. First a cross. We started with some two inch tubes from the extruder. They had sat out for about 24 hours before we started, so they wouldn't be too soft.
We started by very gently twisting them in several random directions
then reinforce with coils to make the seams strong in the middle of the cross
then smooth them out
Flip the cross and smooth the back
then we accentuated the twist curves and added holes for the "wounds of Christ"
Here is my finished cross...it looks like a dead piece of wood. Any ideas on how I should paint/glaze it


I say go for the white on white for the glazing/finishing of the cross piece! I mean it might seem boring but I feel like the color would be symbolic of white the cross means to Christ's followers. Also, white works beautifully with just about any palette and doing the solid white would give it a much more modern feel to it with it seeming like it's trying too hard. Glad to see your update!
ReplyDeleteOur students are working coil pots right now.... Thanks for the extra ideas! www.deafartteacher.blogspot.com
ReplyDeleteOMGoodness, love, love the quietest table gets the pet. Very clever. I am sure the kids love it. I am so going to do this! Thank you...Thank you!
ReplyDeleteOMGoodness, love, love the quietest table gets the pet. Very clever. I am sure the kids love it. I am so going to do this! Thank you...Thank you!
ReplyDeleteI really love the clay cross!
ReplyDelete