
I have had several emails about how to do the One point perspective paintings from this post, http://www.elementaryartfun.blogspot.com/search/label/One%20Point%20Perspective
so I have written the steps for this drawing.
I would suggest, the bigger paper, the better.
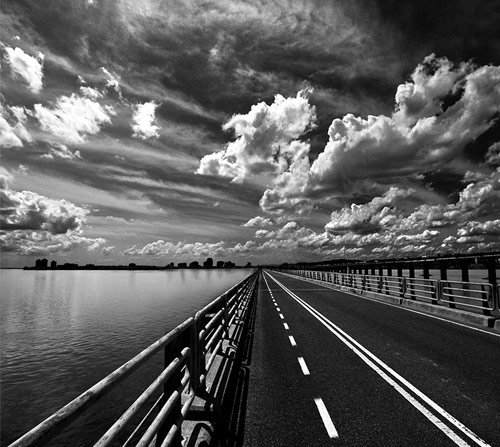
Before you begin, be sure to show students many images to get them excited and print a variety of photos to inspire creativity!
1. Begin with the horizon line in the middle (please excuse my very crooked lines!!! pencil did not photograph well, so I had to redraw some lines with my computer mouse)

2. Draw a dot in the middle (vanishing point) and make an “X” from corner to corner (or close enough) passing through the dot

3.draw the sidewalks first from the vanishing point
4. Draw the trees starting on the bottom on the “X” all the way to the vanishing point, descending towards the middle. Tell them to draw organic shaped trees, not round Que-tip lollypop trees! Make sure the trees are straight and parallel to the side of the paper. Watch students for this before they spend 20 minutes drawing 8 beautiful but very leaning trees and have to erase all of them!

5. This is the lingo I use to teach the buildings, We all say, “One, straight out, two diagonal down, three, straight down to the ground, four straight down again, and five, bring it in along the side!”

6. When I show them the windows we start with the side with the door facing the street.
The lines on the tops and bottoms of the windows ABOVE the horizon line are parallel to the top part of the “X”…….below that, when you PASS the Horizon line, the lines on the tops and bottoms of the windows are parallel to the BOTTOM part of the “X” which is now the sidewalk. The top of the door is also parallel to the sidewalk.
below: RED parallel to RED and BLUE parallel to BLUE
The windows on the OTHER side of the house are normal right angle squares or rectangles.

7. Now erase the “X” and the parts of the horizon line that overlap the trees and buildings

8. finish windows and add details. Some students made it into a river instead of a road. Now that the basic foundation is drawn, the possibilities for creativity are ENDLESS!!
Cars, trucks, planes, restaurants, people, bridges, parades, parks, pedestrians, lights, etc, etc


![[edit5%255B4%255D.jpg]](https://blogger.googleusercontent.com/img/b/R29vZ2xl/AVvXsEh4sfeW3FwBqAhD17q3zk2WwmF8qNYi3H5NTLERYNP2YQhj9bZXwfyNH9dsq01QUI5qA0s6IEBggXyYZWVTRAFfSaTv7gqrG0q-OuzKNUL9CijPv5idCOZaHThzZk35KogntqgSvpNtS7A/s1600/edit5%25255B4%25255D.jpg)
