Search This Blog

Wednesday, September 14, 2011

Bobcats with Chalk Pastels

We are talking about predators and drew these bobcats this week. We talk about all the parts of the face and how he has spots AND stripes. We looked at the white around his eyes, the football shaped pupils, and the fur on the tips of his ears. We watched the videos below to see real bobcats.

edit13

We looked at bobcat art!

edit9

In the first video you can see the bobcat is surrounded by feathers. We talked about how bobcats are a nuisance to farmers, killing their chickens, but that the farmer was going to set him free somewhere far away.

http://www.youtube.com/watch?v=iRsHYEL1mrM

http://www.youtube.com/watch?v=nnCfE6j9rss

Each student could draw the bobcat however they wanted. Then we used the chalk pastels to color them. We talked about value and blending.

edit12

edit10

I just love how this student drew his hiding in the grass!

edit11

Love the big eyes!

edit15

I made this as an example after the student above drew his in the grass. I wanted kids to see that they could draw him from different perspectives and that their drawings don’t always have to fit on the page or be in the middle! If you would like a copy of the lesson plan, just shoot me an email Natty241@hotmail.com

edit17

Next…..Gnomes!!

edit1

Monday, September 12, 2011

Princess Crowns!

You would think after teaching 6 classes a day with 30-35 kids, I would be sick of art by the weekend!!

edit1

Laminated construction paper+ old broken jewelry+ hot glue gun= two happy princesses!!

edit2

edit3

Friday, September 9, 2011

Rain Puddle Prints!!

cesar

We are having a serious drought in Houston right now! Yesterday my room smelled like a BBQ pit all day from the smoke from brush fires north of the city burning tens of thousands of acres of land, houses, and everything in its path. There is a strict water ban rule that we can only water our lawns on certain days. The heat has caused lots of pipes to burst due to the dry ground and water is wasting out on the streets and making huge puddles. This is where this idea came into my head!

I played Milli Vanilli “Blame it on the Rain” while they worked!!! LOL

edit5

First cut the paper in half and cut one side into a large puddle!

edit4

On the other half, draw a city or neighborhood using lots of colors with crayola or watercolor markers filling the entire page (no white paper showing! )

edit3

Spray the puddle with water

water

Place the city on top lining up the straight part of the puddle with the BOTTOM OF THE BUILDINGS

edit2

This is the fold for the box…hot dog style first, then fold in “two doors" then lift the middle and glue the side flaps underneath to make the box

paper

Take photos of students holding umbrella. One of my classes got creative and looked up to the sky and held their hand up like they were catching raindrops, and jumped and pretended to splash. I printed each student in black and white, and then they cut them self out with a tab on the bottom to fold back and glue onto their artwork.

editumbrella_edited-1

students traced over the original drawing to make it clear again when it dried. Then they added sidewalks, ripples around the feet, street lights, and colored the umbrella when finished!

naomi

gisselle

I will post more results when finished!

Sunday, September 4, 2011

Fun with Photoshop!!

painting1
Fun with Photoshop
It hasn’t rained here all summer in Houston Texas,
so we made a photo to show our faith that it is going to RAIN soon!!
Step onetake photo painting sky
painting
Step two- convert to black and white, and adjust contrast, light levels, and sharpen
painting2
Step three- Paint sky and photograph
sky
4. Now go back to your black and white image, click layer/duplicate layer/okay
5. go to the sky painting image and click select/all ……. then click edit/copy
6. now return to the blk and wht photo of your artist and click edit paste….this will paste the painted sky onto your black and white photo.
7.Use the move tool to stretch it and move it to where you want it.
ps_15

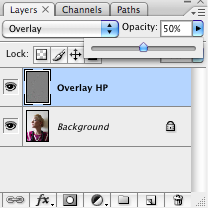
8. Adjust the opacity to taste, to make it see through enough to know where you want to erase

9. then just use the eraser tool to erase around your artist and any other part you don’t want the painting to show, flatten image, and VOILA!!
Email me your creative results or questions and I will post everyone’s photos on my next blog!! Natty241@hotmail.com

Wednesday, August 31, 2011

Monuments

The third graders talked about character traits and monuments today. We talked about how people are inspired by other people and why. We looked at pictures of monuments, particularly in our community like these awesome president heads!

monument3

monument4

monument2

I asked the kids who inspired them and they started naming teachers in our school!!!…so they drew them on poster board Somehow our principal ended up with one ear and no nose…that will be correctedSmile

tp4

Next week they will mix torn toilet paper with glue to make a sticky goop to create a 3d relief for the monuments

tp

One group started today with the PE teacher’s head. I told them to close their eyes and feel their face. What parts stick out? Those are the parts they added the paste to.

tp2

I LOVE the texture! Please give me your opinions..should we paint them with colors or with white and gray for shading to teach value?? I am going to glue a dowel to the back and stick it in a white box to stand them when they are finished! Can’t wait to post the finished product!

tp3

Ok I just had to share this! My husband found this mushroom in the yard…ummm is it just me or do you see a heart shaped mushroom with a peace sign in the middle?? My husband just kept it because he thought it looked “weird”

mushroom

Saturday, August 27, 2011

Marbleized Peacock

edit12
Begin with some shaving cream in a tray or directly on your tables
edit18
These liquid watercolors are one of my most favorite thing in the art room!
edit1
edit8
Choose your color scheme and drip onto shaving cream.
edit6
Use the end of the brush upright, touching the bottom of the tray, and swirl around!
edit7
edit5
edit16
Lay the paper down on the shaving cream, rub it gently, and peel off
edit15
use a piece of cardborad or styraphone to scrape off the shaving cream and reveal the beautiful print. This is when students OOOOOOOOHH and AHHHHHH!!
edit11edit14
Then I usually let the students play in the shaving cream at their table. You can continue to make prints, they just won’t have quite the contrast as the first one. They will leave your room smelling fresh and clean!
edit10
edit9
I then cut out circles from different warm color prints.
edit4
I painted black circles at the bottom and made the eye with oil pastels. I thought the picture needed something in th bottom corners…
edit19
So I mixed up some green and yellow and placed the corners on it, to fill in those empty white spaces and glued everything together for the finished product!
edit3
edit2

Total Pageviews