Fun with Photoshop…
It hasn’t rained here all summer in Houston Texas,
so we made a photo to show our faith that it is going to RAIN soon!!
Step one…take photo painting sky
Step two- convert to black and white, and adjust contrast, light levels, and sharpen
Step three- Paint sky and photograph
4. Now go back to your black and white image, click layer/duplicate layer/okay
5. go to the sky painting image and click select/all ……. then click edit/copy
6. now return to the blk and wht photo of your artist and click edit paste….this will paste the painted sky onto your black and white photo.
7.Use the move tool to stretch it and move it to where you want it.
8. Adjust the opacity to taste, to make it see through enough to know where you want to erase
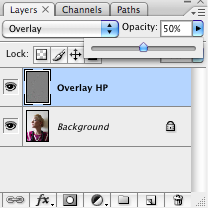
9. then just use the eraser tool to erase around your artist and any other part you don’t want the painting to show, flatten image, and VOILA!!
Email me your creative results or questions and I will post everyone’s photos on my next blog!! Natty241@hotmail.com
Love that you gave instructions! I do not have photoshop at home, but they installed in on my computer at school. Unfortunately I never had the time to sit and play with it. So I love your little tutorial, and it may take me a while but I'd like to give something like this as a try, kind of like a homework assignment. Just give me a little time to hand it in...
ReplyDeletePhyl,once you learn photoshop, you will never want to stop! It is SO much fun! I have several projects planned this year that I am going to use photoshop with. Email me if you have any q's and I am very excited to see your results!
ReplyDeleteLove this post especially since I'm in Houston!!
ReplyDeleteI love this!!!
ReplyDeleteOh my goodness! I love this! Thank you very much for posting :)
ReplyDeleteI absolutely love this. So beautiful and fun.
ReplyDeleteIf you have the two photos and don't have photoshop, you can send them to me and I will do it for you! :-)
ReplyDeleteNICELY done. I love the effect you were able to get. Thanks for the directions. I've been wanting to learn more about photo editing and I just haven't taken the time.
ReplyDeleteWow, I want to try this!!! Thanks:)
ReplyDeleteHmmmm, stuck at the step before convert the photo to black and white. Do I convert in Photoshop,and how do I get my image into Photoshop? (As you can tell, I'm a beginner!)
ReplyDeleteAwesome!
ReplyDeletewow, natalie will you really put the photos together for me? This is the most amazing thing I've seen on pintrest so far! I have to learn photoshop, I use lightroom and just have to find someone to teach me how to use photoshop, and have to actually invest in it as well :). Taking those photos asap :)
ReplyDeleteThis is brilliant! Thank you Natalie for a wonderful tutorial. Your photo is fabulous & I hope you get rain in Houston soon!
ReplyDeleteLove this and I'm going to try it with my oldest!
ReplyDeleteYes, you can convert the photo into black-and-white in Photoshop. When I was first teaching myself Photoshop I thought of the "layers" feature like this: each item that is on a separate layer is on its own sheet of paper, kind of like a flip book. The topmost layer is at the top of your paper pile and each layer beneath it is like another "page". Now, if you start each layer as a *transparent* layer (meaning it has no solid background), you can then think of each item/image/element as being mounted onto a clear piece of plastic. Photoshop does take quite a while to learn...I started in 1994 and am, well, always still learning, but that's the joy of it...fiddle, play, discover!
ReplyDeleteI MUST try this... great idea!!!! Like that you posted a tut for this!!!!
ReplyDeleteThank you very much for sharing this! I have had PSE for a couple of years now without knowing how to use it. Everything worked exactly as you instructed, however, I am getting lines from one of the images bleeding through. How do I correct this?
ReplyDeleteClaire in CT
Nice tutorial to use Photoshop for fun. Thanks for sharing.
ReplyDeleteAmerican Patent Agent
Thank you for this ! :-)
ReplyDeleteAbsolutely adorable! I am so in love. I just started dabbling with photography and photoshop this year. I have found that i might need to take a photoshop class in order to get the most out of it. I love love love that you put the instructions on how to complete this photo. It is amazing! I cannot wait to try it.
ReplyDeleteLOVE LOVE LOVE this idea...thanks for sharing. This is my first visit here and can't wait to see more in the future. Have a blessed Easter. Laurie
ReplyDeletegenetic cavities
ReplyDeleteThanx for sharing, really NICE will have to try it sometime !
ReplyDeleteWhat a genius idea! love love love this. I'm in Katy TX so I totally understand. Though this year we have had better luck with rain. Will follow your blog. check out mine as when I finish with this project I'll include it in my own blog too and give you credit of course!
ReplyDeletewhat other photoshop links or ideas do you have for me next? That isn't too difficult :-)
ReplyDeleteThis is awesome. I'm trying it with my granddaughter. Any other cool ideas like this? Thanks for sharing and giving encouragement to try.
ReplyDeleteVery Nice Picture
ReplyDeleteWe loved your idea so much that we used it in our blog. Thank your for your inspiration. http://miniowls.com/1/category/all/1.html
ReplyDelete